

Introduction
When starting with dRPC, the most important step is setting up your first RPC key. This unlocks the potential of interacting with blockchain nodes and allows you to fine-tune dRPC key settings for better performance, protection, and cost-efficiency. In this guide, we’ll walk you through creating your key and help you understand the key settings that can make a huge difference in how you use dRPC.
Getting Started: Create Your Account
Before creating a key, you must sign up for a free account at dRPC. You can sign up either using your email address or by connecting your crypto wallet. If you’d rather skip the email, just connect your wallet, and you’re good to go.
You can generate your first RPC key once you’ve set up your account. This key is your gateway to using free or paid nodes on dRPC. Now, let’s get into the essential dRPC key settings you should know to maximize your experience.
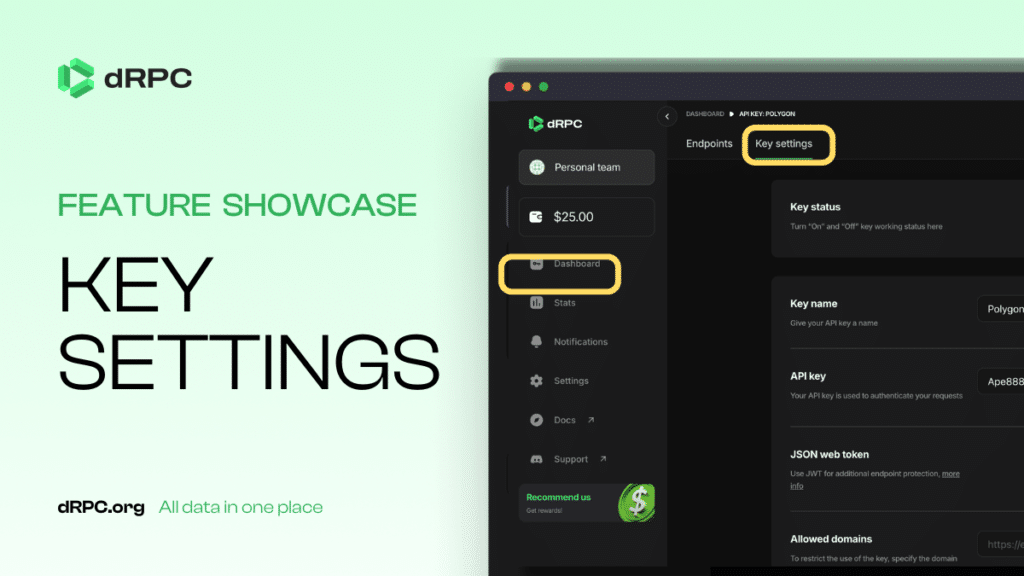
Key Settings Breakdown: How to Customize Your dRPC Key Settings
Once your key is created, you’ll see a bunch of dRPC key settings to adjust in the management tool. Here’s what each setting does and why it matters:
-
Key Status
This setting lets you turn your key on or off without deleting it. It’s perfect when you need a quick break without losing all your customizations.
-
Key Name
If you manage multiple keys, especially from the same blockchain, naming each one will save you from many headaches down the line. Make it easy to recognize your keys at a glance.
-
API Key
This is the key you’ll use to authenticate your requests. It’s visible so you can copy and paste it wherever needed.
-
JSON Web Token (JWT)
Use JWT for extra endpoint protection. If you’re unfamiliar with JWT, check out more info here.
-
Allowed Domains
Want to restrict access to your key? Specify the domain addresses from which requests are allowed. Leave this blank if you want to allow requests from anywhere.
-
Allowed IPs
Similar to domains, but this setting restricts access by IP address. Leave it empty to allow access from any IP.
-
Key Limit CU/Day
You can limit how many Computing Units (CU) your key can use daily. Set this to zero if you don’t want any limits.
-
Key Limit CU/Minute by IP
This limits CU use per minute by IP address. Like the daily limit, set it to zero for no restrictions.
-
Providers
Choose specific providers for your key. This lets you decide which service provider to use for the best performance.
-
Fallback
If your selected providers fail, the fallback setting reroutes to other providers to keep your service uninterrupted.
-
Protect Transactions from Front-Running
Front-running is when others jump in front of your transaction to benefit at your expense. By directing your transactions to MEV (Miner Extractable Value) providers like Blink, Bloxroute, MeowRPC, or Merkle, you protect them from front-running attacks.
Wrapping It Up: Why Customizing Your dRPC Key Settings Matters
Taking the time to adjust your dRPC key settings is crucial to getting the most out of dRPC. A couple of particularly important ones are Allowed Domains and Key Limit CU/Day, which can drastically improve security and cost control. Whether you’re aiming for performance, security, or cost efficiency, these settings give you the flexibility to tailor your RPC key to your exact needs.
Make sure to explore them thoroughly to keep your operations smooth and safe!
